How to Install MAC in Windows ( Hackintosh )
Why choose macOS High Sierra?
macOS High Sierra is ideal for Hackintosh due to its reliable support for NVIDIA Pascal GPUs and older hardware. It offers stability, performance, and wide compatibility with affordable components.
This guide covers everything from hardware selection to troubleshooting and post-installation, with practical tips to ensure system stability and functionality.
Before you begin:
Make a complete backup of all important data. The installation process can erase disks or cause unexpected failures. It’s always better to prevent than to remedy.
2. Hardware Requirements
| Component | Compatible | Avoid | Notes |
|---|---|---|---|
| CPU – Intel | Intel i3, i5, i7 (4th to 6th generation) | Processors prior to 4th generation | 7th and 8th generations are compatible but may require specific patches. |
| CPU – AMD | Ryzen 1000, 2000, 3000 | AMD APUs (integrated Vega graphics) | AMD support may not offer the same stability or functionality as Intel CPUs in some configurations. |
| GPU – AMD | Radeon RX 500, RX Vega | RX 5000 and RX 6000 | RX 500 works natively, eliminating the need for Web Drivers. |
| GPU – Nvidia | GTX 7xx, 9xx, 10xx (Pascal) | RTX, GTX 20xx or higher | GTX 10xx (Pascal): Requires NVIDIA Web Drivers for graphics acceleration. Make sure your High Sierra version corresponds to the correct version of Web Drivers available on NVIDIA’s website. |
| Motherboard | Gigabyte, ASUS, MSI (Intel Z170/Z370 or AMD X370) | Poorly documented chipsets | Make sure to update the BIOS to the latest version before starting. |
| Storage | SATA SSD or NVMe | Old HDDs | Although APFS is ideal for SSDs, it can cause performance issues on older HDDs. In these cases, prefer HFS+. |
| Network | Functional Ethernet (IntelMausi, Realtek) | Unsupported adapters | Ethernet is recommended for initial installation; Wi-Fi can be configured later. |
Note on Web Drivers for NVIDIA Pascal:
For GTX 10xx series GPUs, Web Drivers are essential to enable graphics acceleration. Make sure to download the correct version from the NVIDIA website:
NVIDIA Web Drivers for High Sierra
Note on components in the table:
Intel and AMD CPUs: 7th and 8th generations may require specific patches, making them more complex for beginners.
NVIDIA/AMD GPUs: Choosing older GPUs, such as GTX 10xx, is preferable due to native support of available Web Drivers.
AMD APUs: AMD APUs (integrated Vega graphics) are less recommended due to lack of proper support in macOS.
3. BIOS Configuration
| Setting | Intel | AMD | Description |
|---|---|---|---|
| Virtualization (VT-d/SVM) | Disable | Disable | Can cause boot problems. |
| Secure Boot | Disable | Disable | Reset security keys if necessary. |
| CFG Lock | Disable | Disable | If the CFG Lock option is not available in your BIOS, use the UEFI Shell to disable it manually. For specific tutorials, refer to guides for your motherboard brand and model. |
| Boot Mode | UEFI | UEFI | Required by OpenCore or Clover. |
| SATA Mode | AHCI | AHCI | Ensures compatibility with macOS. |
| Above 4G Decoding | Enable | Disable (older hardware) | Enable this setting only if using modern GPUs. If it causes instability, disable and test again. |
Useful links for CFG Lock and UEFI Shell:
4. Environment Preparation
Necessary Tools
- USB Drive: At least 16GB, formatted as Mac OS Extended (Journaled) with GUID partition scheme. Recommendation: Use USB 3.0 drives to reduce installation time.
- Software (in order of use):
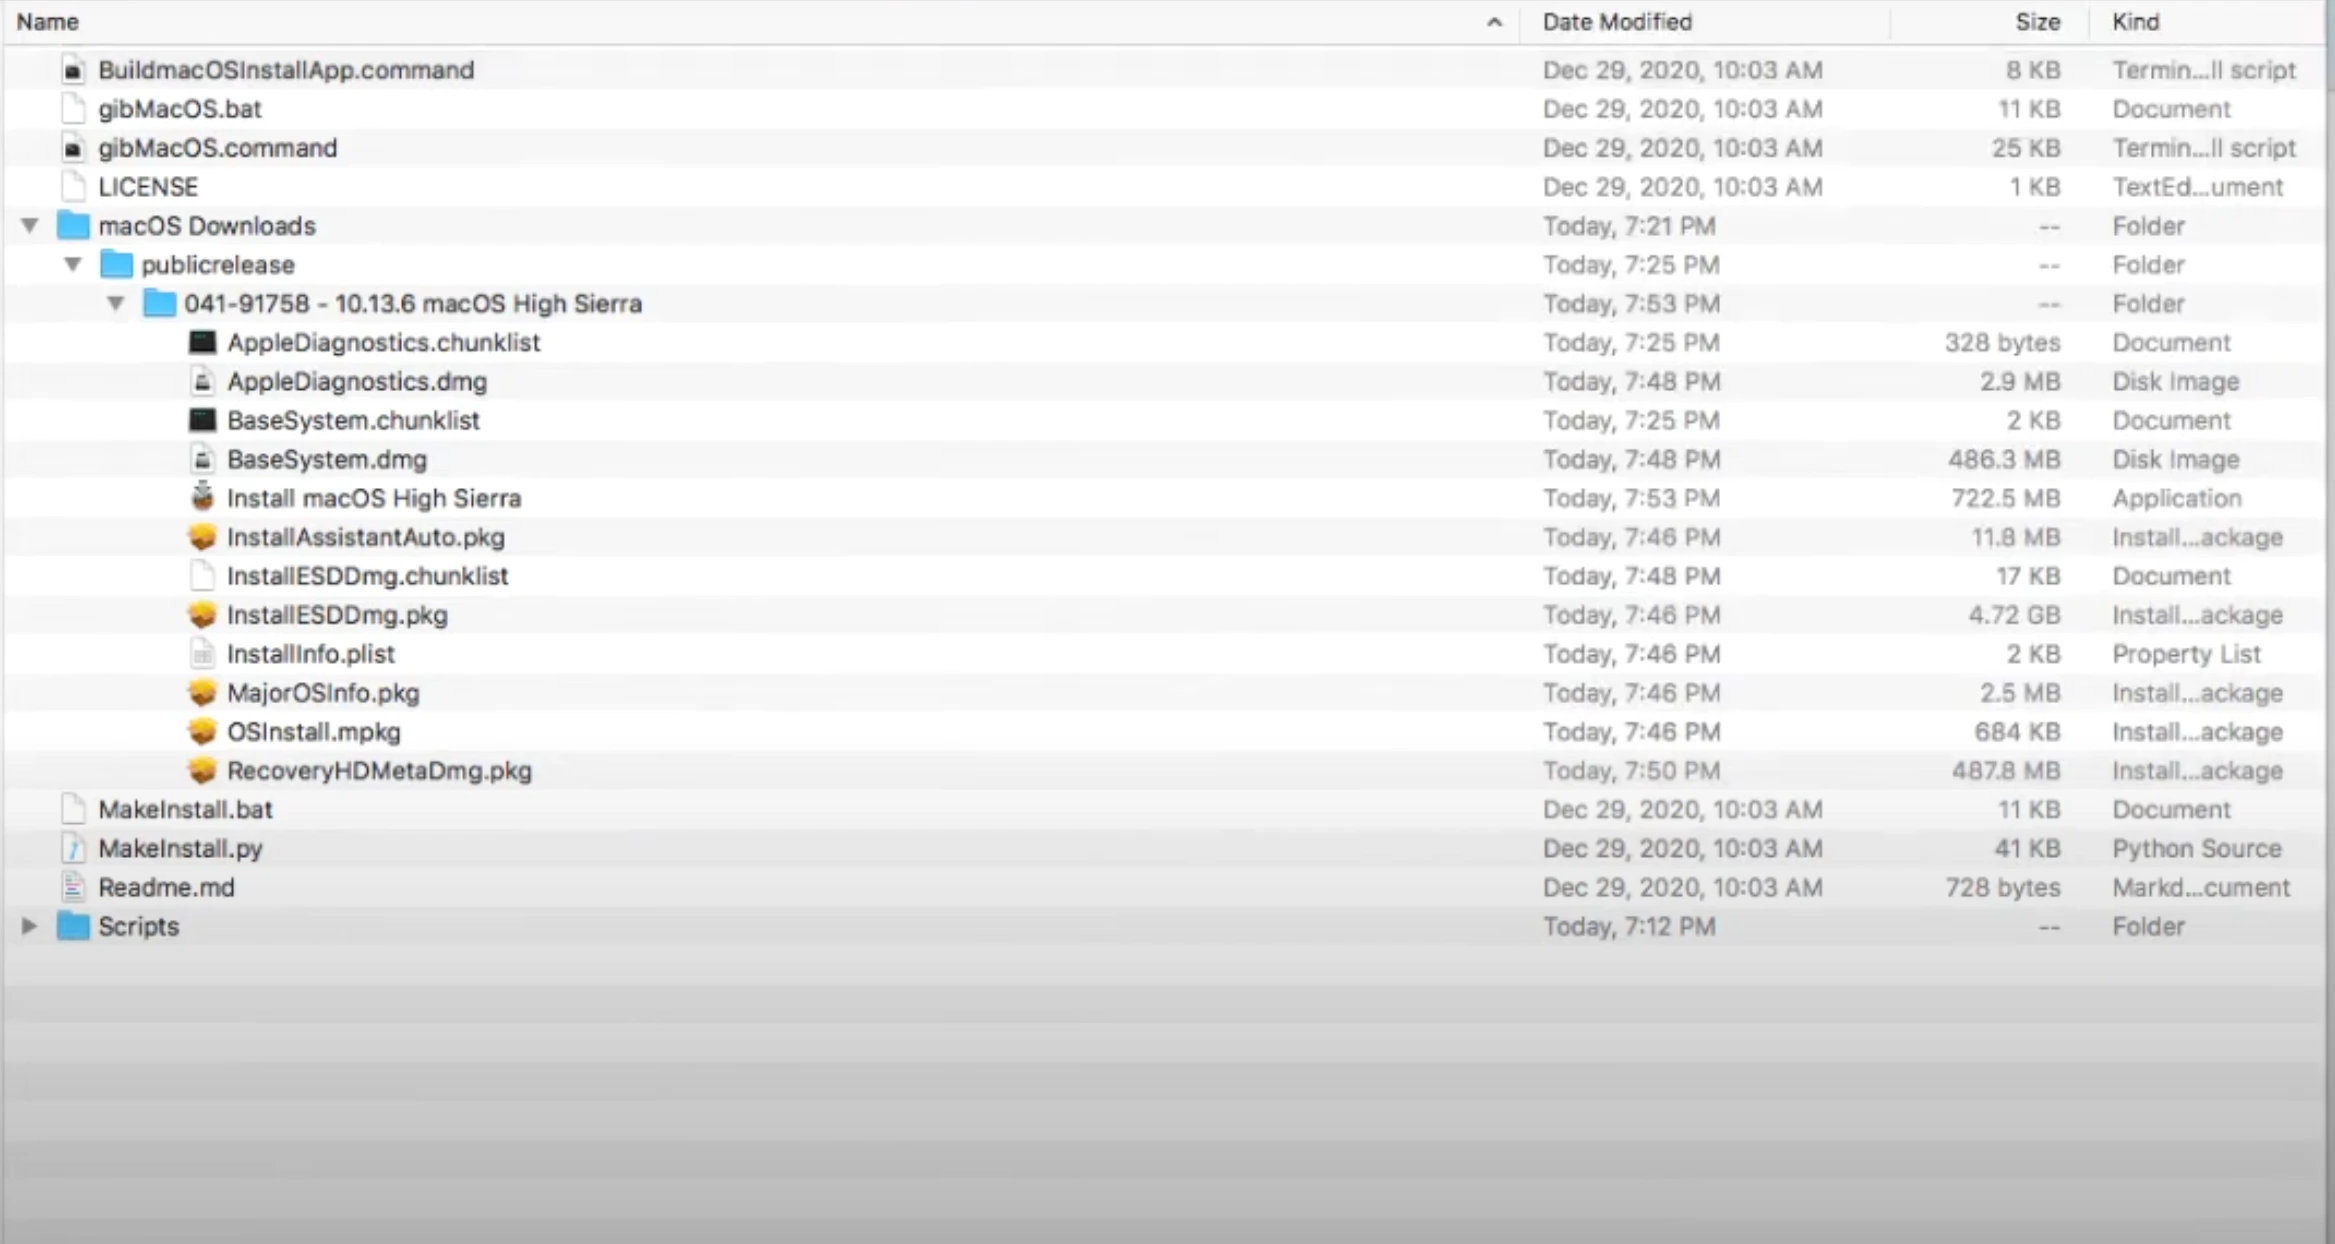
- GibMacOS: To download macOS High Sierra. GitHub GibMacOS

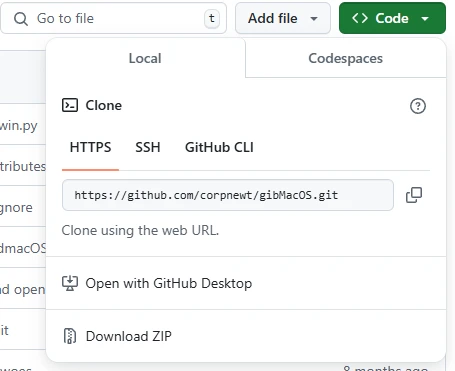
- Click the green “Code” button, located at the top right of the page.
- In the dropdown menu, click “Download ZIP” to download the entire repository as a ZIP file.
- After downloading, extract the contents of the ZIP file to a folder of your choice on your computer.
- ProperTree: For editing OpenCore settings. ProperTree GitHub
- Kexts: Add before installation:
- Lilu.kext: General compatibility. Lilu.kext GitHub
- WhateverGreen.kext: For AMD/NVIDIA GPUs. WhateverGreen.kext GitHub
- AppleALC.kext: For audio. AppleALC.kext GitHub
- VirtualSMC/FakeSMC: For system management. VirtualSMC GitHub
- NVIDIA Web Drivers: Install only after macOS is configured. NVIDIA Web Drivers
- GibMacOS: To download macOS High Sierra. GitHub GibMacOS
SMBIOS Configuration
- Choose an SMBIOS that is close to your actual hardware:
- iMac18,3: For 7th generation Intel CPUs.
- MacPro6,1: For AMD Ryzen CPUs.
Notes: Before changing the `config.plist`, make a backup copy to avoid irreversible errors.
How to access BIOS: To access the BIOS, you typically need to press the DEL, F2, or ESC key when turning on the computer. Each motherboard manufacturer may use different keys. Consult your device’s manual to confirm.
BIOS Adjustments:
- Secure Boot: Usually found in the ‘Boot’ tab. Disable to avoid macOS boot locks.
- CFG Lock: This setting may not appear in some BIOS. In this case, follow specific guides for your motherboard.
5. Step-by-Step Installation
1. Creating the Installer
- Download macOS High Sierra using GibMacOS and create the installer on the USB drive.
- Prepare the Bootable USB Drive:
- Partitions:
- GPT is required to allow macOS to boot correctly.
- Choose APFS when formatting SSDs, as it is optimized for better performance and reliability. For older HDDs, choose HFS+ for greater compatibility.
- Partitions:
- After downloading macOS using gibMacOS, you need to create a bootable USB drive to install the system. To do this, use the MakeInstall.bat included in the gibMacOS folder:
- Prepare the USB Drive: Connect a USB drive of at least 16GB to your computer.
- Run MakeInstall.bat: Open the MakeInstall.bat file in the gibMacOS folder. This script will format and prepare the USB drive to be a bootable macOS installer.
- Choose the USB Drive: The script will list all connected storage devices. Select the number corresponding to your USB drive.
- Copy the Files: MakeInstall.bat will create the EFI partition and copy the necessary files to the USB drive, making it ready for booting.
- Make sure to copy the Kexts and the `config.plist` file to the EFI folder after creating the installer.

2. Adjusting the config.plist
- Essential Adjustments in config.plist:
- Use ProperTree to open the `config.plist` file and make the necessary adjustments. Here are some important steps:
- SMBIOS Configuration:
- Go to the PlatformInfo section in ProperTree and add an appropriate SMBIOS model for your hardware (e.g., iMac18,3 for 7th generation Intel CPUs).
- Tip: Right-click and use “Generate SMBIOS” to generate a valid serial number. Make sure to verify its validity on Apple’s website to avoid conflicts.
- ACPI Patches:
- Add necessary patches, such as SSDT-EC-USBX, which helps with power and USB compatibility.
- Use examples provided by Dortania to add appropriate patches for your hardware.
- Common Boot Arguments:
- Add the `-v` argument to enable Verbose Mode, which helps identify problems during boot.
- If using an NVIDIA GPU, add `nv_disable=1` temporarily until installing the Web Drivers.
- Adding Kexts:
- Navigate to the Kernel > Add section and add the necessary Kexts (such as Lilu.kext, WhateverGreen.kext, AppleALC.kext, VirtualSMC).
- SMBIOS Configuration:
- Tip: Examples of `config.plist` are available on the Dortania website and in GitHub repositories of the Hackintosh community.
- Use ProperTree to open the `config.plist` file and make the necessary adjustments. Here are some important steps:
- Validating config.plist:
- After editing, use the validation function in ProperTree to check for errors or incorrect keys. This can prevent many boot problems and unexpected crashes.
3. Booting from the USB Drive
- Enable Verbose Mode (-v) at boot to identify problems.
- In the OpenCore menu, select Reset NVRAM before starting the boot.
- If it freezes at +++++++: Check if CFG Lock is disabled in the BIOS and review the `config.plist` file.
4. macOS Installer Configuration
- Partition the disk:
- Partition scheme: GPT.
- Format: APFS for SSDs; HFS+ for HDDs.
- Warning: Make sure to select the correct disk when formatting, as this will erase all data on it.
6. Common Troubleshooting
| Problem | Possible Cause | Solution |
|---|---|---|
| Black Screen after installation | NVIDIA GPUs without Web Drivers | Use `nv_disable=1` to temporarily disable the GPU and install Web Drivers. |
| Kernel Panic | Incorrect configuration in `config.plist` | – AppleACPIPlatform: Review ACPI configuration in OpenCore. – Power Management: Use specific patches like SSDT-EC-USBX. |
| Stuck boot or constant restarts | Incorrect `config.plist` configuration or Kexts | – Check SMBIOS: Confirm you’re using a compatible model, like iMac18,3 for 7th gen Intel CPUs or MacPro6,1 for AMD Ryzen. – Review ACPI patches in `config.plist`. Boot issues are often related to SSDTs or incompatibilities in ACPI tables. – Use Verbose Mode (-v): Read error messages displayed during boot to identify the problem. |
| USB ports not working | Incorrect USB configuration | Use USBInjectAll.kext as a temporary solution and map USB ports with Hackintool for stability. |
| CFG Lock enabled | Incorrectly configured BIOS | Ensure CFG Lock is disabled in BIOS. If unable, use UEFI Shell to manually disable it. |
Explanation of Problems and Solutions:
- Black Screen after Installation:
This usually happens because NVIDIA GPUs require specific Web Drivers to function correctly in macOS. - Kernel Panic:
Kernel panics can occur due to incorrect settings in `config.plist`, especially in the power management (ACPI) section. - Examples of Verbose Mode Messages:
- Still waiting for root device: Indicates compatibility issues or failure in SATA/USB port configuration. Can be resolved by verifying correct USB port mapping or adjusting SATA mode in BIOS.
- AppleACPIPlatform: Messages related to AppleACPIPlatform indicate conflicts in ACPI power management. This can be resolved by applying appropriate ACPI patches.
- Error allocating 0x#### pages at 0x####…: Usually related to CFG Lock being enabled. Disable CFG Lock in BIOS or use UEFI Shell to manually disable it.
- DSMOS has arrived: This message is positive and means macOS is loading, but if the system stops after this message, an essential kext like Lilu.kext might be missing.
7. Post-Installation
- Activate iServices: Use OpenCore Configurator to create a valid and unique SMBIOS. This allows activation of iCloud, iMessage, and FaceTime.
- Stability Adjustments: Configure Sleep/Wake and map USB ports to avoid future issues.
- Performance Improvements: Use Intel Power Gadget to monitor CPU and adjust power management.
8. Useful Sources and Links
| Source | Description |
|---|---|
| Dortania OpenCore Guide | Comprehensive and updated guide for configuring OpenCore. |
| Tonynacx86 High Sierra Guide | Great for Clover Bootloader users. |
| InsanelyMac Forums | Active community for detailed technical support. |
| NVIDIA Web Drivers for High Sierra | Necessary for NVIDIA Pascal GPUs (GTX 10xx). |
| Acidanthera GitHub | Official source for reliable Kexts like Lilu, WhateverGreen, and AppleALC. |
| Reddit – r/Hackintosh | Active community with discussions and solutions for custom problems. |
| Hackintool | Indispensable tool for mapping USB ports and adjusting system details. |
| ProperTree GitHub | Recommended config.plist editor for OpenCore adjustments. |
| GibMacOS GitHub | Tool for directly downloading macOS installers. |

Rewrite the Rules of Victory with EXO
Transform your gameplay with tools that make you unstoppable. Victory is just a click away.

Exclusive Cheat Trial on Exo Discord
Join EXO Discord to explore cheat trials, connect with experts, and master game-changing strategies. Elevate your gaming experience today!
Expand Your Knowledge

Fecurity Fortnite Cheat Tutorial
Complete Guide to Installing Fecurity Fortnite Cheat: Step-by-Step Fortnite Cheat Tutorial Looking for a straightforward…

How to Install Fecurity Cheat for Marvel Rivals
This guide covers the essential steps to install and configure the Fecurity cheat for Marvel…

BGX Script League of Legends Tutorial for MAC OS
If you’re playing League of Legends on a MAC OS and want to use BGX…

